MAVLink
"MAVLink is a very lightweight messaging protocol for communicating with drones (and between onboard drone components)." - Markdown Wiki
MAVLink Frame Structure

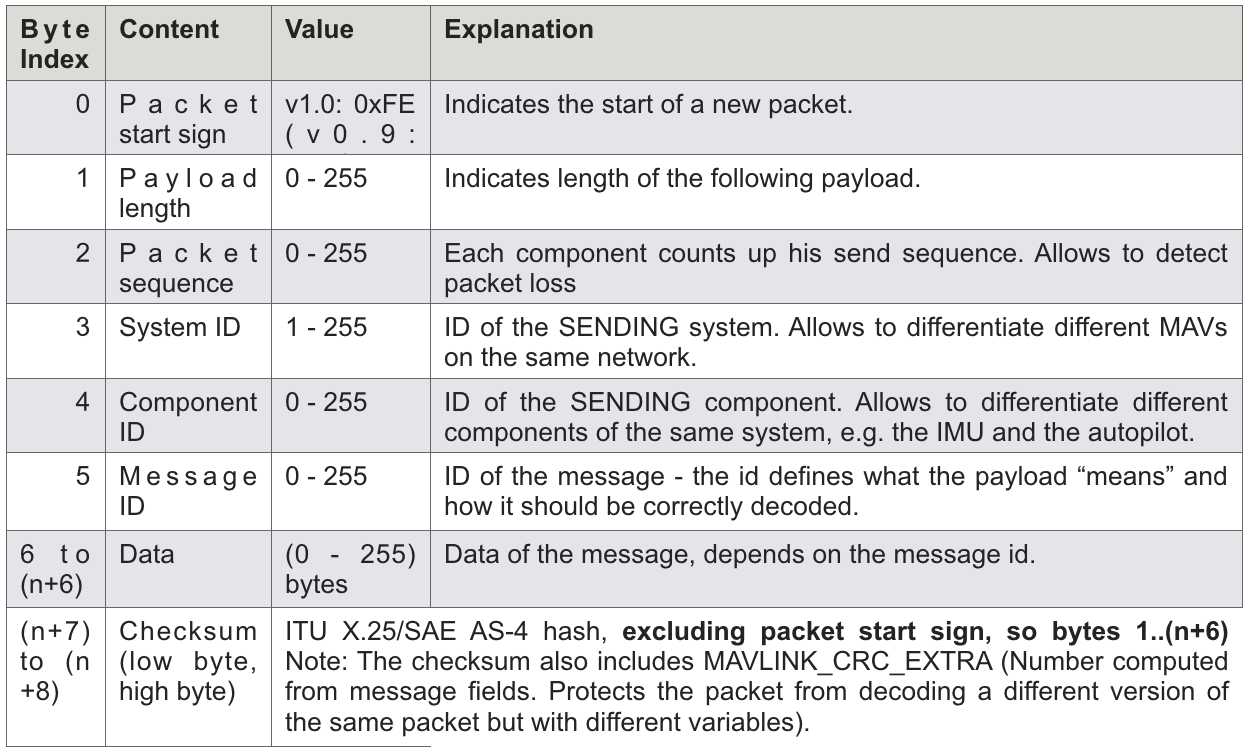
The System ID for the ground control station is typically 255, and 1 for the Pixhawk. The component ID is often set to 0, but if there is more than one component (besides the Pixhawk) receiving messages, it can be modified to specify which component will receive the message.
MAVLink Messages vs. Commands
For clarification, there is a functional difference between messages and commands, although oftentimes they are both referred to as “messages”. Mavlink commands are a subset of messages that have a corresponding number (enum value) and begin with “MAV_CMD”. Specific differences are outlined here, but the key points are that commands usually perform some action, have built-in acknowledgment behavior, and take in 7 command-specific parameters (eg altitude). You can technically recreate preset commands using messages which would of course be inefficient, but it shows how flexible messages can be.

For example, message COMMAND_LONG (Message ID 76) can take in the command MAV_CMD_NAV_TAKEOFF. The command’s enum (22) and its 7 corresponding parameters would be the data of the message. See this link for a full list of the default messages and commands.
There exist three subtypes of commands. They each have their own execution priority described here.
- Navigation commands: Control the movement of the vehicle. Have highest priority. Example:
- DO commands: Typically set parameters (such as altitude).
- Conditional commands: Used to control DO commands (conditional statements for them)
Resources
Our collaborative useful links doc
The Arduino encodes sensor data and sends it to the Pixhawk in the MavLink package format.
While you can have multiple messages under one component ID, you can’t have duplicate messages under the same component ID (for example 2 thermistor messages) since the data from both thermistors will be written to the same message and overlap. You could for example have
There is a set of defined component constants that should ideally be followed for style so the list of components is descriptive. Component 0 is reserved because it will transmit the message to all components on the system.
The message ID will correspond to the specific message you’re writing.
Example
BATTERY_STATUS(float temperature, float battery_voltage, int COMP_ID)
Of course, the Pixhawk doesn’t know if there is actually a battery connected or if you are using a random number generator and passing that in as the battery_voltage variable. So long as you format the data correctly for that specific message, whatever data the Arduino sends will be seen by the Pixhawk. This can be useful for testing, but also shows why you must use good coding practices (guilty as charged): Is that temperature field being passed in from the thermistor in the front of the plane or the one actually connected to the battery pack?
Relevant Messages
For the full list of messages, see: https://mavlink.io/en/messages/common.html For which components we need, see (subject to change): Requirements Sheet
Motor Battery Pack:
- BATTERY_STATUS (#147)
- Voltage and temperature
PDB Battery Pack:
- BATTERY_STATUS (#147)
- Voltage and temperature
Plane temperature (Air, ESC):
- HYGROMETER_SENSOR (#12920)
- ESC_STATUS (#291) or ESC_INFO (#290)
Useful for testing:
- NAMED_VALUE_FLOAT (#251)
- May be viable as more than a test message if the name field can be set (and doesn’t get confusing in the GCS dashboard) since it would be easier than creating our own custom message
Interesting messages that may be useful in the future (anything potentially related to future goals):
- ONBOARD_COMPUTER_STATUS (#390)
- TRAJECTORY_REPRESENTATION_BEZIER (#333)
- HOME_POSITION (#242) and SET_HOME_POSITION (#242)
- Commands (don’t have a “#” before them)
- MAV_CMD_NAV_PATHPLANNING (81)
Writing MAVLink Code
Receiving Messages (on the Pixhawk)
Keep in mind that the system ID is the Pixhawk’s ID, so sending/receiving is from the perspective of the Pixhawk. Data collected from the sensors is received by the Pixhawk (it is the destination). Messages can also be sent from the Pixhawk, in which case the destination would be the companion computer (Arduino). Sending messages will be used for more advanced functions in the future as we attempt to automate more of the plane’s functions, but you have to learn to walk before you can run.
Basics: - The Pixhawk operates at a baud rate of 57600 - The arduino must therefore transmit data at this rate or it will be gibberish
The general flow of sending a message (sensor code omitted):
//Define all constants for your sensors and MAVLink (ideally do this in a .h file)
#include message_1.h

void setup() {

}

void loop() {
HEARTBEAT(COMP_ID_1);
MESSAGE_1(param1,param2,...paramn);

}

//Define functions that correspond to each MAVlink message you’re using
HEARTBEAT(int COMP_ID_1) {

}


MESSAGE_1(param1, param2,...paramn) {
    //variable for message 1
mavlink_message_t msg1;
//constant for the size of a mavlink message
uint8_t buf[MAVLINK_MAX_PACKET_LEN];
//packs the mavlink message
mavlink_msg_message_1_pack(param1,param2,...paramn);
//loads the message to be sent into a buffer of length buf
uint16_t len1 = mavlink_msg_to_send_buffer(buf, &msg1); \
//writes the message stored in the buffer over serial
mySerial.write(buf, len1);
}
Download the MAVLink C library from https://github.com/mavlink/c_library_v2 and copy the contents of the top-level folder and paste them into Arduino/libraries. Ideally this Arduino folder/directory will be in your home directory on Linux and in Documents for Windows. That is your core folder. Arduino has 3 places it looks for libraries in, Core Folder, IDE Installation Folder, and sketchbook. More on library installation here. Do not install mavlink from the built-in library manager. That is not the correct one.
All of the messages you’ll need will be in the common folder, which corresponds to https://mavlink.io/en/messages/common.html. These are the messages for the standard dialect of MAVlink, however there also exist other custom dialects such as https://mavlink.io/en/messages/ardupilotmega.html.
Every message will have its own .h file that you’ll need to include if you plan to use that message.
In the .h file, CTRL+F “pack” and you will see a function declaration to show you how to use the function. For example:
/**
 * @brief Pack a named_value_float message
 * @param system_id ID of this system
 * @param component_id ID of this component (e.g. 200 for IMU)
 * @param msg The MAVLink message to compress the data into
 *
 * @param time_boot_ms [ms] Timestamp (time since system boot).
 * @param name  Name of the debug variable
 * @param value  Floating point value
 * @return length of the message in bytes (excluding serial stream start sign)
 */
static inline uint16_t mavlink_msg_named_value_float_pack(uint8_t system_id, uint8_t component_id, mavlink_message_t* msg,
                               uint32_t time_boot_ms, const char *name, float value)
As the name suggests, this function packs messages into the MAVLink format. You can see it being called in the definition of its corresponding function.
void NAMED_VALUE_FLOAT(float temperature, int COMP_ID) {
    mavlink_message_t msg3;
    uint8_t buf[MAVLINK_MAX_PACKET_LEN];
    char name[10] = "abcdefghij";
    mavlink_msg_named_value_float_pack(DEST_SYS_ID,
                                        COMP_ID,
                                        &msg3,
                                        0,
                                        name,
                                        temperature);
    uint16_t len3 = mavlink_msg_to_send_buffer(buf, &msg3);
    mySerial.write(buf, len3);
}
The parameters for the pack function should match the parameters of the Arduino message definition function. If you see incorrect data or no message under the component ID you were expecting, abuse print statements to check that all your parameters are correct from the top-down (for example in the void loop you didn’t call
NAMED_VALUE_FLOAT(temperature_esc, DEST_SYS_ID) instead of NAMED_VALUE_FLOAT(temperature_esc, SENSOR_2_COMP_ID).
Resources:
MAVLink Protocol Overview For an excellent overview of the MAVLink protocol, see: https://discuss.ardupilot.org/t/mavlink-step-by-step/9629 https://discuss.ardupilot.org/t/mavlink-and-arduino-step-by-step/25566
Documentation:
https://mavlink.io/en/mavgen_c/
Useful guides:
None atm: 💀
Useful videos: https://www.youtube.com/watch?v=vygpjQaycIc
https://www.youtube.com/watch?v=mLpJHNXgEc8
https://www.youtube.com/watch?v=gF3llCRyEqY
https://www.youtube.com/watch?v=d_K6VnJK75o
https://www.youtube.com/watch?v=YPpzIjPwc3s
https://www.youtube.com/watch?v=qLfxzeKu2Hg
Ammeter:
https://learn.adafruit.com/adafruit-ina260-current-voltage-power-sensor-breakout/pinouts